

纯小白如何在win11环境下运行MPI程序
行文背景:本文写于22年7月13日(后疫情时代),win11环境而intel oneAPI 中的HPC toolkit 目前与win11并不完全适配的情况下,在查阅了很多资料(极少量英文资料)要不是年代久远无法保证各部分完全同步更新,要不就是无法完全兼容总是容易出现各种问题,且本站对于类似问题或配置环境中产生问题并没有特别多的讨论,对于完全没有一次运行经验的新手来说过于不友好,故写下此文给新手提供一点帮助,希望大家不再因为环境的配置而头疼很久。
需求:
- 系统:win11(系统非常重要至少我是在尝试很久intel开发的HPC tookit很久后才发现是win11中修改了win10中的一个net动态链接导致问题)
- 基础IDE:vsCode(不完全算IDE不过自由度很高给我们提供了很多可选空间)(有很多下载blog这里不过多阐述)
- C Compliler:Mingw-w64 (MinGW已经停止更新很久了,与Mingw-w64内置GCC版本差别很大)
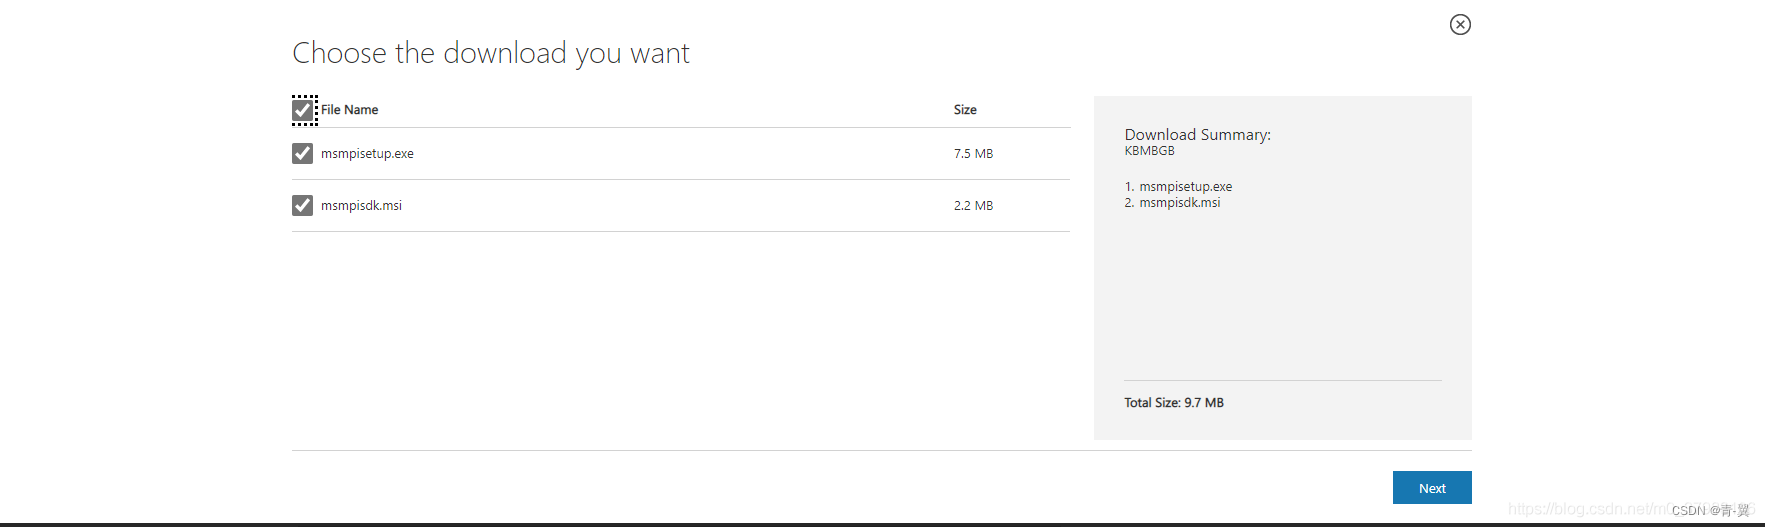
MinGW-W64 (安装路径后面会用到)

1、这里两个包都需要下载,并安装,安装位置自选 (路径后面需要用到)
2、测试。安装后打开cmd,执行
set msmpi,如果能打印出相应路径表示安装成功,如图。

到这里准备工作就结束了。
1、MinGW配置
下载好Mingw-w64后我们需要配置环境变量
找到系统变量的Path这一条,点击编辑
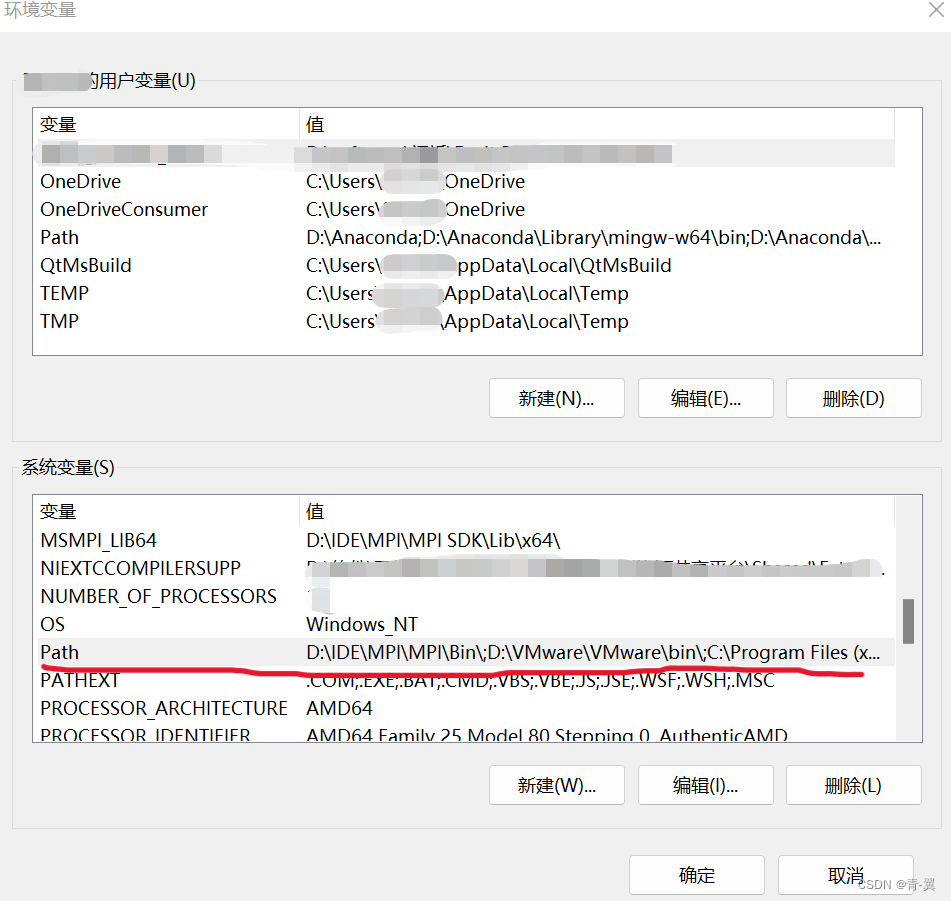
将下载的Mingw-w64文件中bin文件夹的路径加到最后,点击确定。
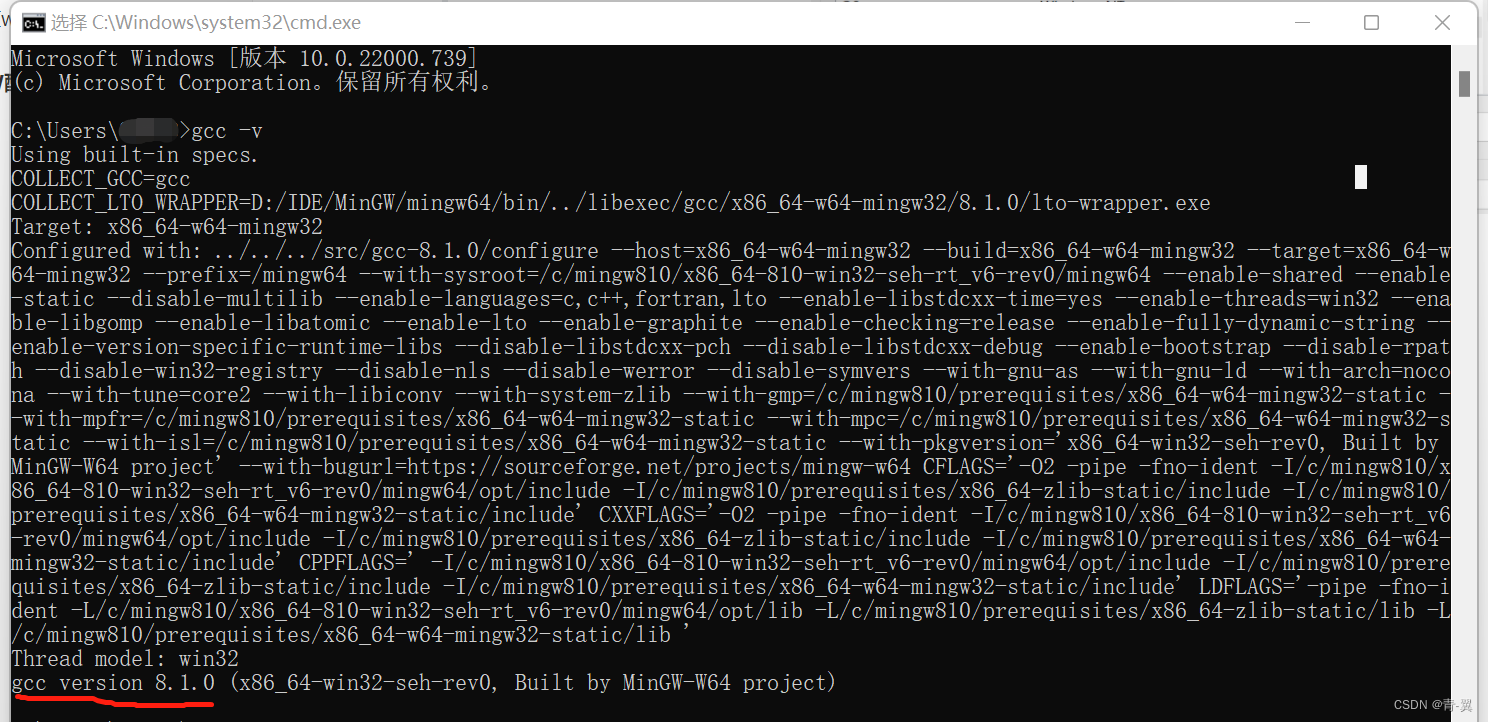
最后来测试一下配置成功没有。
打开cmd,输入gcc -v如果出现下图的情况则完成配置。
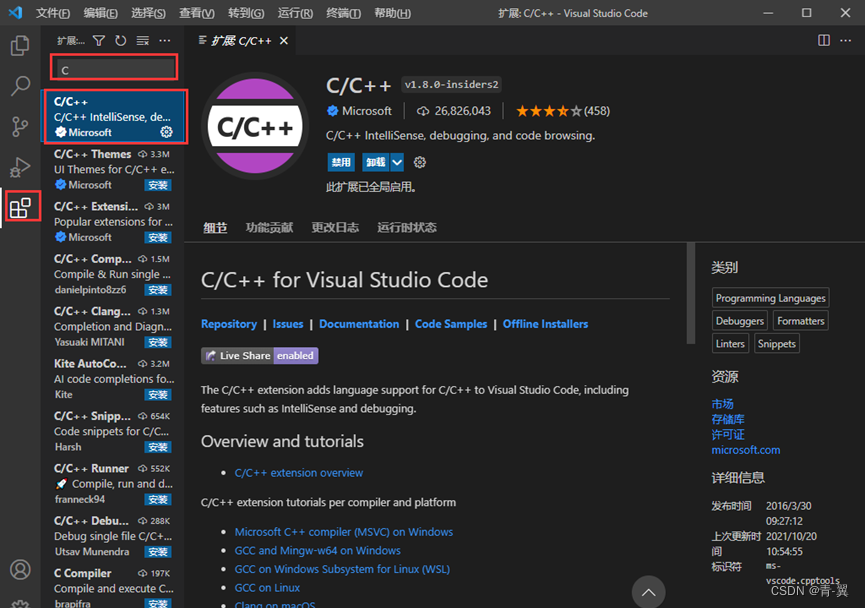
2、配置vsCode中的c环境
首先下载C/C++插件
打开一个你喜欢的存放程序的文件夹

在这个文件夹下新建一个hello.c的文件,并且新建一个.vscod的目录(前面有一个点),在这个目录下新建三个文件分别命名为c_cpp_properties.json、launch.json、tasks.json 如图

首先打开c_cpp_properties.json配置文件夹,写入如下配置信息,注意路径要改成自己的MinGW的路径,后面的路径不变
{ "configurations": [ { "name": "Win32", "includePath": [ "${workspaceRoot}", //这里mingw64之前的路径要换成自己安装的路径 "D:/IDE/MinGW/mingw64/include/**", "D:/IDE/MinGW/mingw64/bin/../lib/gcc/x86_64-w64-mingw32/8.1.0/include/c++", "D:/IDE/MinGW/mingw64/bin/../lib/gcc/x86_64-w64-mingw32/8.1.0/include/c++/x86_64-w64-mingw32", "D:/IDE/MinGW/mingw64/bin/../lib/gcc/x86_64-w64-mingw32/8.1.0/include/c++/backward", "D:/IDE/MinGW/mingw64/bin/../lib/gcc/x86_64-w64-mingw32/8.1.0/include", "D:/IDE/MinGW/mingw64/bin/../lib/gcc/x86_64-w64-mingw32/8.1.0/include-fixed", "D:/IDE/MinGW/mingw64/bin/../lib/gcc/x86_64-w64-mingw32/8.1.0/../../../../x86_64-w64-mingw32/include" ], "defines": [ "_DEBUG", "UNICODE", "__GNUC__=6", "__cdecl=__attribute__((__cdecl__))" ], "intelliSenseMode": "msvc-x64", "browse": { "limitSymbolsToIncludedHeaders": true, "databaseFilename": "", "path": [ "${workspaceRoot}", //此处路径也要更换 "D:/IDE/MinGW/mingw64/include/**", "D:/IDE/MinGW/mingw64/bin/../lib/gcc/x86_64-w64-mingw32/8.1.0/include/c++", "D:/IDE/MinGW/mingw64/bin/../lib/gcc/x86_64-w64-mingw32/8.1.0/include/c++/x86_64-w64-mingw32", "D:/IDE/MinGW/mingw64/bin/../lib/gcc/x86_64-w64-mingw32/8.1.0/include/c++/backward", "D:/IDE/MinGW/mingw64/bin/../lib/gcc/x86_64-w64-mingw32/8.1.0/include", "D:/IDE/MinGW/mingw64/bin/../lib/gcc/x86_64-w64-mingw32/8.1.0/include-fixed", "D:/IDE/MinGW/mingw64/bin/../lib/gcc/x86_64-w64-mingw32/8.1.0/../../../../x86_64-w64-mingw32/include" ] } } ], "version": 4}
共有14条语句需要更换Path注意不要漏掉
之后打开launch.json文件,并输入如下配置信息,有两条语句需要更改路径
xxxxxxxxxx{"version": "0.2.0","configurations": [{"name": "(Windows) Launch","type": "cppvsdbg","request": "launch","program": "cmd","preLaunchTask": "echo","args": ["/C","${fileDirname}\\${fileBasenameNoExtension}.exe","&","echo.","&","pause"],"stopAtEntry": false,"cwd": "${workspaceFolder}","environment": [],"externalConsole": true},{"name": "(gdb) Launch","type": "cppdbg","request": "launch","program": "${workspaceFolder}/${fileBasenameNoExtension}.exe","args": [],"stopAtEntry": false,"cwd": "${workspaceFolder}","environment": [],"externalConsole": true,"MIMode": "gdb",//注意更换路径"miDebuggerPath": "D:\\IDE\\MinGW\\mingw64\\bin\\gdb.exe","preLaunchTask": "echo","setupCommands": [{"description": "Enable pretty-printing for gdb","text": "-enable-pretty-printing","ignoreFailures": true}]},{"name": "(gdb) 启动","type": "cppdbg","request": "launch","program": "输入程序名称,例如 ${workspaceFolder}/a.exe","args": [],"stopAtEntry": false,"cwd": "${fileDirname}","environment": [],"externalConsole": false,"MIMode": "gdb","miDebuggerPath": "/path/to/gdb","setupCommands": [{"description": "为 gdb 启用整齐打印","text": "-enable-pretty-printing","ignoreFailures": true},{"description": "将反汇编风格设置为 Intel","text": "-gdb-set disassembly-flavor intel","ignoreFailures": true}]},{"name": "(Windows) 启动","type": "cppvsdbg","request": "launch","program": "输入程序名称,例如 ${workspaceFolder}/a.exe","args": [],"stopAtEntry": false,"cwd": "${fileDirname}","environment": [],"console": "externalTerminal"},{"name": "C/C++: gcc.exe 生成和调试活动文件","type": "cppdbg","request": "launch","program": "${fileDirname}\\${fileBasenameNoExtension}.exe","args": [],"stopAtEntry": false,"cwd": "${fileDirname}","environment": [],"externalConsole": false,"MIMode": "gdb",//这里也要更换路径"miDebuggerPath": "D:\\IDE\\MinGW\\mingw64\\bin\\gdb.exe","setupCommands": [{"description": "为 gdb 启用整齐打印","text": "-enable-pretty-printing","ignoreFailures": true},{"description": "将反汇编风格设置为 Intel","text": "-gdb-set disassembly-flavor intel","ignoreFailures": true}],"preLaunchTask": "C/C++: gcc.exe 生成活动文件"}]}
最后打开tasks.json文件,同样也有一条语句需要修改路径。
xxxxxxxxxx{"version": "2.0.0","tasks": [{"label": "echo","type": "shell","command": "gcc","args": ["-g","${file}","-o","${fileBasenameNoExtension}.exe","-fexec-charset=GBK"]},{"type": "cppbuild","label": "C/C++: gcc.exe 生成活动文件",//记得更改路径"command": "D:\\IDE\\MinGW\\mingw64\\bin\\gcc.exe","args": ["-fdiagnostics-color=always","-g","${file}","-o","${fileDirname}\\${fileBasenameNoExtension}.exe"],"options": {"cwd": "${fileDirname}"},"problemMatcher": ["$gcc"],"group": "build","detail": "调试器生成的任务。"}],"presentation": {"echo": true,"reveal": "always","focus": false,"panel": "shared","showReuseMessage": true,"clear": false}}
3、配置MPI环境
其实每次运行MPI程序的时候都需要在cmd中运行编译出来的exe程序,但是对于新手,出于便捷考虑这里使用vsCode中的Code Runner插件代替每次编译完后再利用cmd运行的繁琐过程。
首先我们需要下载Code Runner 插件
- 在扩展中直接搜
Code Runner安装 - 打开 扩展设置,找到
Code-runner;Exexutor Map

- 点击Code runner Executor Map左边的齿轮,点击
将设置复制为JSON文本,然后点击在settings.json中编辑 - 找到如下内容
xxxxxxxxxx"c": "cd $dir && gcc $fileName -o $fileNameWithoutExt && $dir$fileNameWithoutExt","cpp": "cd $dir && g++ $fileName -o $fileNameWithoutExt && $dir$fileNameWithoutExt",替换为
xxxxxxxxxx"c": "cd $dir && gcc $fileName -o $fileNameWithoutExt -fopenmp -l msmpi -L \"D:\\IDE\\MPI\\MPI SDK\\Lib\\x64\" -I \"D:\\IDE\\MPI\\MPI SDK\\Include\" && mpiexec -n 4 $fileNameWithoutExt","cpp": "cd $dir && g++ $fileName -o $fileNameWithoutExt -fopenmp -l msmpi -L \"D:\\IDE\\MPI\\MPI SDK\\Lib\\x64\" -I \"D:\\IDE\\MPI\\MPI SDK\\Include\" && mpiexec -n 4 $fileNameWithoutExt",注意更改路径
4、一点强迫症
此时其实一切都配置好了,但是在#include "mpi.h"下面一直有错误提示,虽然不影响运行,但是很别扭,这是因为在我们的c配置中没有添加mpi的include文件,只要在c_cpp_properties.json 中添加上就行了(记得添加在末尾时要加上逗号分隔符)

5、最终测试
最后写一个简单的Hello World 测试一下

这样就配置完成了。
那么这里我们就会发现,只有四条进程在运行,如何改变进程个数呢?
这里就要提到之前说的Code Runner实际上只是帮助你在cmd中利用mpiexec运行编译好的exe文件,所以我们重新回到Code Runner时候的settings.json文件中,找到更改的语句,只要修改这里的数字4就可以改变最后参与运行的进程数。

6、写在最后
当然如果intel更新了的话,更推荐使用intel 的 oneAPI toolkit 不仅十分智能化一键自动配置环境,还拥有众多包功能强大能应用在很多地方,其代表了intel大统一的成果。
Happy coding !!!